I really would have liked a place of my own but lacked finance. My husband was never keen on the career path I was following, working in pubs! So I decided to start a home-based catering operation. I supplied food for parties, lunches and dinners at home, and often to various pubs in and around the area.
The kitchen in our home was large and well fitted. We had a big utility room and storage areas in the garage (no car ever saw the inside of those walls)! All well equipped and ready to go, Country Cooking was born.
There wasn’t any problem with getting work. Three local pubs ordered meat pies on a weekly basis; a restaurant asked for a selection of deserts; there were bookings to cater for parties and buffet lunches. A family friend generously donated headed stationary and aprons decofetd with a lovely logo – sorted!
Well, and here we are. How many weeks are we in of the big shut down? I’ve lost count. I was disappointed that I couldn’t continue to do my Sainsburys shop, which was my only foray into the world outside my cul de sac. But the upside I’m happy to be spending happy hours trawling through old (I mean ancient) cook books and scribbled notes on menu’s from the past, home and jobs. Although today I’m testing a vegan tea loaf – in the oven at present – will give the verdict later….
Following day …
Sliced tea loaf in half to test the centre. This is not a cake nor is it bread – texture definitely dense and sticky, a true malt loaf. Let’s say a “marmite” bake. Certainly full of flavour from all the fruit. So how did I do it?
Vegan Tea Loaf
You will need:
a 2lb loaf tin greased and lined.
6oz raisins
2oz chopped dates
1 mashed banana
2oz brown sugar (dark or light)
7oz wholemeal self raising flour
2oz ovaltine powder or granules (or other malty drink)
½ teaspoon baking powder
½ teaspoon bicarbonate of soda
½ teaspoon salt
2 fluid oz’s plant milk
1 teabag (preferably earl grey for best flavour)
Method:
Set the oven to 4-5 gas (180 fan)
In a bowl ass raisins and dates, teabag on top. Cover with boiling water and leave to soak for 15 minutes minimum
In a large bowl add all the dry ingredients, mix well
Empty wet stuff – raisins and dates (without the teabag) banana and half the milk and stir thoroughly. If its too stiff add the rest of the milk and any remaining soaking liquid
Spoon into a lined tin and bake for 40 minutes.
Test the centre with a skewer, if its still sticky then return to the oven for 10 minutes (cover with foil if the top is too dry)
Cool and slice – what do you think? My granddaughter loved it!
Ginger and caramel tray cake
Now for an old favourite, even with folk who say they aren’t keen on ginger. You will need an oblong tin – deep – not swiss roll type. 8” x 12” (ish) greased and lined.
7oz soft butter
5oz brown sugar
3 table spoons black treacle
3 large eggs
8oz self raising flour
1 teaspoon ground ginger (optional)
1 small jar diced stem ginger in syrup
1 tin caramel (nestle)
Method
Medium oven gas 4 (160 fan)
In a large bowl place all ingredients (but only 2 large spoons of caramel and 2 of diced ginger, not the syrup)
Whisk it all together thoroughly
Place into a tin and cook for 30 minutes – it should be firm and risen – if its not put it back covered with grease proof paper for 10 more minutes
When cooked place it on a cooling rack
Whilst warm, prick the top with a fork or skewer and poor over some of the ginger syrup then spread thinly with caramel
Leave it to cool still in the tin
Cut it into squares
Enjoy! Definitely one of my favourites. See what the vegans are missing – sorry folks!
Just a final note – we are in for a tough time. Weeks or months, who knows? Everyone is affected in a different way. I have had long periods of working from home and it was always the lack of social contact that was hardest to cope with – but at least it prepared me for this! I am fortunate in having family close enough to bring in my supplies and show a cheery face at the window. Myself and my neighbours, all elderly and living alone, are keeping an eye on one and other and speaking on the phone. We have a rota and although now we cant help out by shopping, we can keep chatting – a laugh and a moan – but we are in contact. I’m sure you are all doing the same. So keep it up – stay fit and well. Chat, moan, and laugh away, till next time.
Bye for now. Love from Gran E x
I’d love to see if you trial this recipe. Send me your pictures – I’m @gran.e.bakes on Instagram.
All good things (even work) come to an end, so after a few eventful and enjoyable years in California I returned to Sheffield, not knowing what lay ahead.
It was now the early 80’s (the decade, not my age!). Pubs didn’t really serve food, aside from bags of crisps and nuts with your pint or port and lemon; eating out was the domain of cafés and restaurants. Slowly Ploughman’s Lunches, maybe prawn sandwiches, chicken-in-a-basket and chips crept in – a culinary revolution!
There was a country pub just outside Sheffield in the Peak District. The pub was busy in the evenings – still in the era before the realisation drinking and driving wasn’t a sensible thing to do – but lunchtime trade was poor. The proprietor had an idea the local farmers and workers could be tempted by a pie to go with their lunchtime pint. Now who could he get to produce the appropriate meat and potato fare?
In a conversation with a friend who worked there my son said his Ma had just returned from working the America and perhaps making these pies would suit her. After meeting and talking through ideas the owner decided this was worth a try and – Bingo – busy lunchtimes ensued!
The increased trade drove the demand for more variation on the menu. As the clientele were predominately male (and this was still the 1980’s!) shepherd’s pie was added. This was supplemented by a new idea of mine, Hot Spicy Beef sandwiches – huge joints of brisket slowly cooked overnight in beer (what else!), then thickly sliced and served in fresh crusty bread.
Word quickly spread, so food-service was expanded to early evenings to boost trade further. Of course the customer base also evolved – a wider mix of ages and (especially) more female customers – so more dishes and options were needed.
The lunchtime eaters were mostly farm workers and businessmen passing through. I was told plain, tasty food was the order of the day – meat pies being a perfect example.
One elderly gent gave fair warning and in no uncertain terms that he didn’t hold with “them there ‘erbs an’ stuff – and none of that garlic an’ all!”.
As I used both liberally I conveniently forgot to mention and kept my fingers crossed as he tucked into whatever pie was on the menu that day. Fortunately no complaints ever came to my ears!
The evening food still needed to be fairly simple; I was working alone in a cupboard-sized kitchen. The bar staff served, cleared tables and helped with washing up but there was only me cooking Monday to Friday. I did get Saturdays and Sundays off (seems strange nowadays doesn’t it?) as the bar staff dealt with sandwiches and ploughmans at the weekend. As my confidence grew, and having learned the art of lasagne and spare ribs in California, they were now included. Customers seemed more prepared to accept ‘erbs an’ that there garlic in the evening. Food was served until 7.30pm, seemed to work fine!
When the business was sold (at a healthy profit of course) I had a new boss, a lovely lady who took over with her husband and two grown up children. This was a happy spell for me. Busier than ever, and I had help! Brenda was really supportive and hired an assistant, the wonderful Nora. Here background as a school dinner lady and mother to a large family of grown up kids was the best training she could have had!
Business boomed, so much so that it was again sold on at a healthy profit. In came another new owner, wanting to go further into developing a bistro restaurant style. Much work was done extending the kitchen, food preparation and storage areas and – onwards and upwards – more staff. I like things small but done well, and this was getting too big for my style.
Reluctantly, and after much deliberation, I decided it was once again time to move on; I was going to go it alone.
Let’s continue with scones. This is a similar method to pastry but with a different ratio of fat to flour. Scones need a hot oven so don’t forget to pre-heat to around 220 degrees, around gas mark 7 or 8.
The basic ingredients for 6-9 scones (depending on size!):
10oz [284g] Self raising flour
2oz [57g] butter
½ teaspoon salt
A large egg (beaten)
Milk (around ½ a cup) to add gradually
For sweet scones:
2oz [57g] of caster sugar
3-7oz ([85-190g] dried mixed fruit, chop small especially if using apricots or dates
Savoury Scones:
5oz [140g] or so grated cheese
Teaspoon of mustard mixed in with the egg
Herbs/Olives/Sundried Tomatoes can be added to the dry mix
After rubbing in the fat into the flour add your dry ingredients. Next add the beaten egg and mix with a palette knife. The dough should be much softer than pastry but not sticky wet!
Handle the dough as little as possible – the heat and moisture from your hands can have a significant impact. Form into a soft ball on a floured work surface. Pat this ball gently out into a flat shape about ¾inch [2cm] thick, but not too thin.
For small scones use your smallest serrated round cutter. Alternatively, pat into larger circles and cut across the top into wedge shapes. Brush the top of your scones with milk; for cheese scones sprinkle a little grated cheese over the tops.
Keep an eye on your scones whilst in the oven, they cook quickly. You’ll see them rise after about ten minutes, then need a further 10-15 mins according to your oven. The tray may need to be turned around. When the scones are ready remove from the oven and cool on a wire rack.
Bye for now!
I’d love to see if you test this recipe. Send me your pictures – I’m @gran.e.bakes on Instagram.
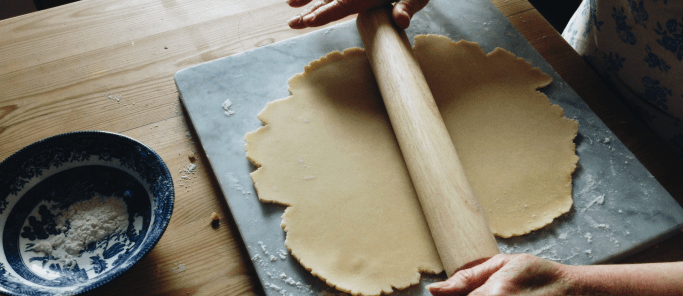
So, let’s start with a real basic – necessary for all baking –Traditional Pastry.
In my opinion the best mix to use is not the one you’ll see in all the cookery books from Delia to Paul Hollywood; it’s mine!
This is (roughly):
Half Plain Flour
Half Self-Raising Flour
Half Butter
Half Lard
Salt (1/2 a teaspoon to each 8 oz [227g] flour)
Rubbed in by hand as I always did in my early years. It wasn’t until much later in life when I could afford a food processor, a Magimix. This remains to today my pride and joy (other brands and makes are available!).
For sweet pastry add icing sugar (two tablespoons per pound [454g] of flour), stirred into the initial dry mixing.
Something to note is that my measurements can sometimes be quite approximate and a bit mixed. I am a great believer in having recipes as a basis to work from; if they need changing then do so to meet your own tastes or requirements.
For savoury pastry grated cheese, seeds, herbs and/or spices can be added, again to the dry mix.
A beaten egg and cold water solution is used to bind the bread crumb like mix together. Always do this by hand – that is with a large flat-bladed (palette) knife with a cutting action across the mix. Add the liquid little-by-little, DO NOT add too much!
Sprinkle –> Cut –> Mix
until everything is just coming together. Then, use your had to gently make a ball of dough. Now we are ready for Rolling Out.
Sprinkle your work surface with semolina and flour (Yes! It gives the pastry a nice crunch) – use just flour if semiolina isn’t in your store cupboard. Place the dough ball on the surface and press gently with the side of your hand to flatten out. Next, using a rolling pin (preferably a long one with handles, lightly floured) gently roll out the dough, turning often, until you have a reasonably thin rectangle or circle to the shape of your plate or dish. Leave dough slightly thicker for a top crust.
Even suitable for vegans…
My youngest granddaughter is vegan, so I now make a version of the pastry for her – which the rest of the family say is as good and as tasty as my tried and trusted one.
Trex and Cookeen are the plant-based fats I’ve found to be best suited, although I’m sure many others are available. I’ve rubbed this with a half plain / half wholemeal self-raising mix (salt as in traditional pastry).
If you’ve read any of my life tales – then you’ll know I’d love to be demonstrating my methods. Nothing beats face-to-face and doing, not just talking. My eldest granddaughter (who understands this new fangled internet stuff!) suggested the blog and, you know what, I do feel as if I’m speaking to you – if anyone is actually taking any notice of course!
I’m leaving you now but I’ll be back – perhaps talking about scones (a similar method to pastry) and suet crust (traditionally used for meat based pies).
Bye for now. Definitely au revoir and not adieu.
I’d love to see if you test this recipe. Send me your pictures – I’m @gran.e.bakes on Instagram.
And it really was! My cousin and her husband had lived there for many years, and were now well established in the Hotel and Restaurant business. They had recently acquired a stunning cliff-top restaurant right on the coastal road. Highway One is spectacular, hugging most of the the California coastline for 656 miles. The main theme was chef’s grilling swordfish, steaks, chicken and ribs on a huge, brick, open-style barbeque cooker. Looking to increase trade at lunchtimes to a wider customer base I was to produce – guess what – quiches and homemade soups! Clam chowder became a favourite alongside my own carrot and coriander soup.
Highway 1
Living with the family in their stunning home in nearby Pebble Beach, driving to work by the ocean, Barbara Streisand on the radio – what kind of a job was that?!
I was gathering tips on; cooking a good lasagne; on blanching spare ribs in boiling water before marinating and slow roasting; the same with squid, blanch first to prevent the rubbery texture, dry well then dip in flour and quickly deep fry – YUM!
Salads and dressings all made from fresh local produce were amazing. One thousand ways with garlic – grown in vast prairie-like fields – practically unheard of or at least not used enough here in the UK. All useful stuff, expanding my ever growing repertoire.
Another English couple owned a tea shop in nearby Carmel-by-the-Sea. They were looking for a cook to produce English style baking, scones, cakes and yes, quiches! So, three mornings a week (stretching to 3pm!), I baked in this quaint cricket-themed caff called The Sticky Wicket. The baking – or rather the preparation – became a feature. Absolutely no-one made pastry from scratch, or scones. Standing there rubbing fat into flour, another demonstrating role was born!
Around the corner was another restaurant. Owned by Clint Eastwood, he was known to pop into the Sticky Wicket for coffee and one of my handmade scones and a chat. He was also a customer at Rocky Point (the cliff-top eatery), being very friendly with my cousins. It was a very busy life but so rewarding; and again, I learned a lot.
But, all good things must come to an end. It was time for me to head back to Sheffield.
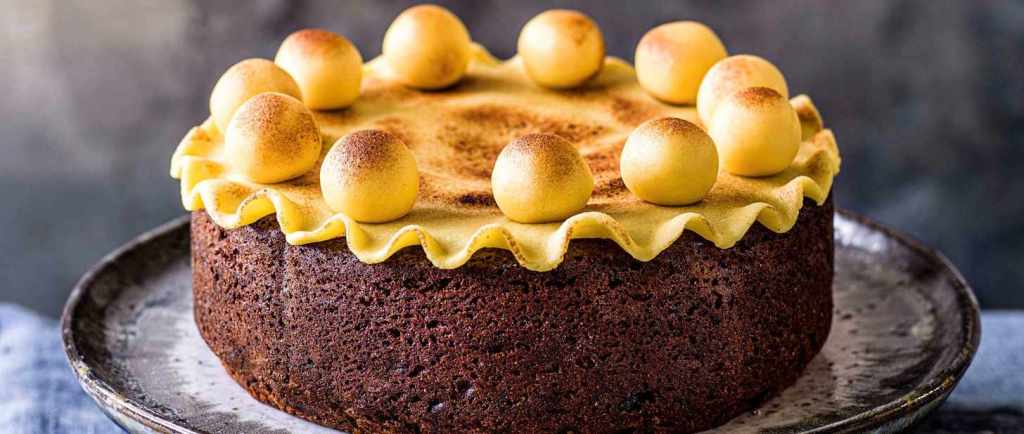
What a strange, scary-sad time we are experiencing, unlike any other period I have known. Having an interest in food and cooking is keeping me sane. Flour is in short supply – although I usually keep a good stock (which is dwindling) – an appreciated Mother’s Day gift of 2 large bags was very welcome. Over Easter I was trawling my old recipes – an unusual Simnel cake using chocolate is a tasty treat!
You will need a deep 8” (20cm) cake tin with a loose base or a springform tin, greased and lined. Set the oven to gas 4 (160 fan).
Ingredients:
8oz raisins – soaked in (enough to cover) a sweet sherry, wine or amaretto liquor is good
8oz butter – a block, softened
8oz golden/caster sugar
4 large eggs – beaten
9oz plain flour
2oz coco powder
1 level teaspoon baking powder
1 level teaspoon bicarbonate soda
1 teaspoon vanilla essence
1 small carton plain yogurt or soured cream
1 packet of block marzipan (to cover the finished cake) plus an extra block to form eleven small balls (apostles!) to decorate
1 bar plain chocolate to melt over the marzipan
Method
Mix all the dry ingredients together in a bowl
Beat together the butter and sugar in a separate bowl
Slowly add the egg and vanilla essence to the butter and sugar
Fold in the dry mix
Add the fruit with the liquid, yogurt/soured cream
If the mixture is still a little stiff, add a drop of milk
Transfer to the tin and bake for 1 hour and 15 minutes
Test the centre with a metal skewer, it should come out clean (if not put back into oven cover top with greaseproof paper and give it another 10 minutes)
Once cooked, leave to cool
Brush the top of the cake with warm Jam (to stick the marzipan)
Dust surface of the table and rolling pin with icing sugar and coco powder to prevent sticking
Roll out the marzipan (if it’s difficult put it in the microwave for 10 seconds) and lay over the cake
Make 11 balls of marzipan and roll them in the coco and icing sugar
When the cake is covered in jam – then marzipan – melt the chocolate with a knob of butter and pour over the cake, place the balls around the edge
Vegans, have you discovered the alternative to egg whites?
Aquafaba! Yes, this magic liquid comes from draining your chickpeas! It does take longer to whisk – but reasonable results are obtained. A large stand mixer works best and you can leave it running whilst getting on with preparation. A hand (electric) whisk does the job as well, although you need to stand for around 10 minutes – perhaps the aquafaba in some tins is more watery.
Before you venture into proper meringues, maybe you would like to try this simple version.
Macaroon biscuits.
Aquafaba from chickpeas thoroughly whisked until fairly stiff
4oz caster sugar
1 teaspoon corn flour
2oz ground almonds
4oz desiccated coconut
Method
Put the oven to gas 4 (fan 160-170)
Mix together the dry ingredients
Gently fold into the whisked aquafaba (make sure the dry mix is well incorporated)
Have ready 2 baking sheets lightly greased and covered with baking paper or rice paper
Place a dessert spoon full of mix – widely spaced – onto baking sheets. Flatten slightly with the back of the spoon (dipped in water to prevent sticking)
Bake for 20-30 minutes until firm (not brown)
I’ll sign off this section – asking you all to stay positive – keep in touch with family and friends… from a distance! Live from week to week, this will pass.
Love to you all, Gran E
I’d love to see if you trial this recipe. Send me your pictures – I’m @gran.e.bakes on Instagram.
Having little or no money meat was never high on my list – cheese and vegetables always a better option even then in the 1960’s (vegetarianism isn’t a recent thing!). My husband played football and cricket, always inviting his pals back for supper. Cheese and onion pies were a firm favourite.
Party food at this time was sausage rolls, the aforementioned cheese and onion delights, the Hedgehog (pineapple and cheese chunks on cocktail sticks stuck into an upturned grapefruit!) and vol au vents – mini pastry cases filled with prawns or mushrooms in sauce. I hear this retro style is making a comeback!
Needing an outlet for myself I joined a friend who scoured fashion warehouses for slight seconds and samples. We sold these at house parties (very popular at the time) along with jewellery, make-up and other household stuff – a great way for young mums to socialise.
We did very well with the clothes, branching out into fashion shows before opening a shop. In the 1970’s this was before small boutique-style outlets came into vogue.
As my children grew up we had many parties for them and their pals. My meat and potato pies with beans and/or mushy peas were always a favourite – this theme remains strong 40 years later!
After a few years in the rag trade another friend proposed a radical change of direction – a garden centre were looking for a cook “with ideas” to open a cafe – again, the norm today but quite unusual at the time.
I became well known for menus, many of the items unheard of at the time;
It was the era of the quiche – very new, a savoury custard tart! – with my mixes of vegetables and herbs (“what the ‘ell are they?”!)
Homemade Soups – carrot and coriander a real favourite
Individual variations on my meat pie
A range of fruit flans including banana and custard, carrot cake
This all went down a storm, the owner of the garden centre was delighted. However, never being one to stand still I was intrigued when another new invention appeared – microwave ovens! I was offered a role demonstrating this amazing space-age technology in large stores around Yorkshire and Derbyshire. After attending a training course at the Philips factory I returned home with a large appliance to practice cooking techniques and recipes on and a list of locations keen to see this new fangled wizardry! It was a fascinating and informative role but quite exhausting, travelling hundreds of miles in my car packed full with food and equipment.
Even today I would not be without my microwave, but as an aid to cooking, not a replacement. You can save time starting food in the microwave – particularly roots for roasting or apples for pies.
So, with the UK covered came my next challenge – California beckoned!
Sometimes the simplest bakes become the long-time favourites. If like me you like to spend lazy weekends baking (or everyday in lockdown), these are a perfect choice.
Chocolate Crunch.
Melt 8oz of butter in a pan
In a large bowl mix;
4oz [117g] of cornflakes, crushed with a rolling pin
3 oz [88g] desiccated coconut
5oz sugar (any – brown, white or mixed)
5oz SR flour
2 dessert spoons of cocoa powder (not hot chocolate!)
Add the melted butter to the dry mix
Have ready a well greased swiss roll tin 12”x8”
Press the chocolate mix into the tin, level off with the back of a large spoon
Place the tin in a pre-heated oven, 180 degrees, gas mark 4
Leave on the middle shelf for 20-30 mins
The mix should bubble gently then firm up
When slightly cooled, thickly cover with a mix of plain and milk chocolate (4-6oz)
Maybe add some crushed maltesers or any other left over chocolate, buttons, smarties and the like
Rough up the topping with a fork
Cut into squares whilst still in the tin, before completely cold or you won’t be able to cut smoothly
Lift out with a broad bladed implement when set
This is something quite young children can make, they especially love the sprinkling part. All my grandchildren made this, to be enjoyed by all ages.
Speedy Chocolate Cake.
Another easy, child-friendly bake. This dates back to my daughter’s younger years, this is a useful basic cake made special by the filling and topping.
You will need 2 x 8” sandwich tins, greased and lined with greaseproof paper. Pre-heat your oven to a medium setting – around 180 degrees, Gas Mark 4. Ingredient list:
7oz plain flour
2 tablespoons of cocoa
1 level teaspoon of baking powder
1 level teaspoon of bi-carbonate of soda
5oz of caster sugar (golden is best)
2 large eggs
¼ pint of milk (full cream is best!)
2 tablespoons golden syrup
¼ pint of corn or sunflower oil (yes, really!)
Mix all the dry ingredients in a large bowl. Beat the eggs and milk in a jug. Make a well in the centre of your dry ingredients, pour in the milk and egg mix then drizzle in the golden syrup and oil. Now beat this all together with a wooden spoon until you reach the consistency of pancake batter.
Don’t Panic!
Pour equal amounts into the two sandwich tins. Give a little tap on each tin – you should see bubbles in the mix. Place the tins into the middle of the oven and bake for 30-40 mins – depending on your cooker! The cakes should rise well and be firm(not hard) to the touch. Place the tins on a wire rack to cool.
Toppings and Fillings.
Now onto the special bit. The following are two of my favourites.
1. CLASSIC
A layer of jam (my preference is apricot) topped with butter cream (2oz each of butter and icing sugar whisked together with a little warm cream or milk with ½ a teaspoon of vanilla essence. Place the second cake on top and spread over some melted chocolate.
2. SPECIAL
You will need a tin of black cherries (drained but keep the syrup). I am a boozy cook so like to use alcohol to spice up mixes, sauces, fillings and toppings – most things actually! So, any sweet sherry, gin, white rum or liqueur remnants you may have around can be mixed with the cherry juice and boiled up to reduce a little. Sprinkle your cooling cake bases with this liquor before the toppings are spread.
Creamy fillings can be made with double whipped cream, mascarpone, cream cheese – any of these added to the basic butter cream.
Now fold in ½ of the cherries to cover one cake. Save a little of the creamy filling to mix with melted chocolate to cover the top layer and dot with the remaining cherries. A sprinkle of white chocolate can be a very good addition.
Experiment with other fruits or those small jars of ginger in syrup to make unusual but complimentary combinations.
Coffee and caramel blend beautifully with chocolate. And remember, do not use cooking chocolate, the normal stuff is best!
Enjoy!
Have you tried this recipe? I’d love to see your pictures – I’m @gran.e.bakes on Instagram.